неделя, 14 ноември 2010 г.

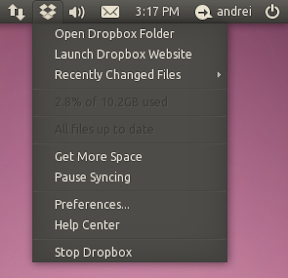
Dropbox Monochrome Icons As A .deb Or PPA


Dropbox mono icons

T. Scott Barnes maintains a package in his PPA called "monochrome-icons-extra" which comes with monochrome Ubuntu-mono, Humanity, and Elementary icons for Dropbox, along with a few other mono icons.

To add the PPA, use the following commands in a terminal:
sudo add-apt-repository ppa:tsbarnes/misc
sudo apt-get update
sudo apt-get install monochrome-icons-extra

Alternatively simply download this DEB file (but you won't receive any updates).

The icons no longer have to be manually copied into the ~/.dropbox-dist folder so if you upgrade Dropbox you will no longer lose the mono icons.

Important: the icons only work with the latest Dropbox experimental build which you can download from the Dropbox forum. To install the latest experimental Dropbox, run the following commands in a terminal:

32bit:
dropbox stop
cd
wget http://dl-web.dropbox.com/u/17/dropbox-lnx.x86-0.8.107.tar.gz
tar -xvf dropbox-lnx.x86-0.8.107.tar.gz

64bit:
dropbox stop
cd
wget http://dl-web.dropbox.com/u/17/dropbox-lnx.x86_64-0.8.107.tar.gz
tar -xvf dropbox-lnx.x86_64-0.8.107.tar.gz

The above URLs will change when a new Dropbox version will be released on the forum so check out the latest version on the forum. There is also an update script which automatically installs all the new Dropbox versions.

сряда, 27 октомври 2010 г.

Pastie – handy clipboard manager indicator applet

Pastie is a small clipboard manager that uses an indicator-applet to display and give access to you clipboard history.
It boasts a modest set of configurable preferences including history size, options to set keyboard shortcuts and minor interface tweaks to the applet itself.

Download

It has its own PPA
sudo add-apt-repository ppa:hel-sheep/pastie
sudo apt-get update && sudo apt-get install pastie
Mono-Icon
By default Pastie uses a stock GNOME icon for its indicator. FOr users of Ambiance or Radiance this looks less than ideal but is easily remedied by replacing the stock icon with mono-style equivalents created by DeviantArt user ~Ramzea.
Download, extract and pop your required icon in

  • /usr/share/icons/Humanity/actions/22

четвъртък, 21 октомври 2010 г.

Public Ubuntu Font Family PPA For Ubuntu 10.04 Lucid Lynx And 9.10 Karmic Koala

Add the PPA and install the Ubuntu Font using the following commands:

sudo add-apt-repository ppa:webupd8team/ubuntu-font-family 
sudo apt-get update 
sudo apt-get install ttf-ubuntu-font-family

HOWTO: Run MAME + GMAMEUI latest on your pc. Quick guide

Without further ado – A qiuck guide for newbies how to get MAME up and running on your Lucid Ubuntu up and running

  1. get latest mame from here: http://sdlmame.wallyweek.org/download/. Choose first mame-common which is suitable for your Ubuntu ( Lucid in our case) and let synaptic package manager install it. Be sure to go with COMMON FIRST.OTHERWISE YOU WILL GET AN ERROR. Then go and install mame and mame tools the same way. I choose sdlmame( now officialy merged with mame) cos this project is alive and updated. You will find XMAME proposed as a choice more often, but this project is dead now.
  2. Now we have to put GUI for your convinience This is the so-called frontend. I like best GMAMEUI. Still supported and with nice GNOME interface. Run your software manager, cearch for GMAMEUI, and install it. The shortcut will appear in Programs – Games. Well,run it. GMAMEUI will ask you where your mame app is. It is located in /usr/games. And is called mame(surprised?) Set a folder you wish for your roms folder. Be sure to remember what you've chosen
  3. Some settings that can DRAMATICALLY improve your performance. Go with Options – Default Options. In video be sure that for Video mode OpenGL is selected.

  4. Next, deselect filter in OpenGL :

  5. AND, FINALLY CHECK PERFORMANCE. MAKE SURE AUTOMATIC FRAMESKIP IS SELECTED.( This setting changes performance dramatically for me. Games can change from barely playble to perfect performance with this setting, at least for me


  6. That's petty much all. Go and use your ROMS now, put them in your roms folder, then : File – Audit All Games , wait for a while, and double click your rom and play it
Some tips:
TAB when game started will bring a menu, which will let you change lots of setings, game controls most notable.
F11 will show performance. Percents shown better be around 100%. Lower percents shown mean worse performance.


My PC is IBM Thinkpad x40. It is old enough, and I get nece playing experince – better than MAME run under XP. These setting work fine for me. If they dont work for you, fiddle with default options.
Hope I helped.Now lets play Pacman

Absolute to Relative Symbolic Links

absolute to relative symbolic links

Kernel Downloads

Kernel Downloads

Recover Lost Disk Space

Recover Lost Disk Space
How to edit the FSTAB file

The fstab file sets which volumes mounts and at what point.

неделя, 17 октомври 2010 г.

How to enable x11 on totem

gstreamer0.10-ffmpeg should be installed through Synaptic package manager.

In terminal, run:

gstreamer-properties

Go to the video tab and change it to X Window System (No Xv)

вторник, 12 октомври 2010 г.

How to install Glippy

Glippy can be installed via the following PPA. The PPA only contains Glippy so there won’t be any unexpected upgrades or installs that you weren’t seeking.

sudo add-apt-repository ppa:bikooo/glippy
sudo apt-get update && sudo apt-get install glippy glippy-ubuntu-mono

Launch Glippy from the Applications > Accessories menu.


ThinkPad middle button scroll Ubuntu 10.10 Maverick


Use the middle button + trackpoint to scroll horizontally and vertically. Based on Eastwood Zhao‘s post, updated for Ubuntu 10.10 Maverick.
Create /usr/share/X11/xorg.conf.d/20-thinkpad.conf
sudo gedit /usr/share/X11/xorg.conf.d/20-thinkpad.conf
Insert the following:

Section "InputClass"
Identifier "Trackpoint Wheel Emulation"
MatchProduct "TPPS/2 IBM TrackPoint|DualPoint Stick|Synaptics Inc. Composite TouchPad / TrackPoint"
MatchDevicePath "/dev/input/event*"
Option  "EmulateWheel"  "true"
Option  "EmulateWheelButton" "2"
Option  "Emulate3Buttons" "false"
Option  "XAxisMapping"  "6 7"
Option  "YAxisMapping"  "4 5"
EndSection


Save the file (Control+x y Enter)
Reboot the computer

Tested on a Lenovo ThinkPad X201 and x40

събота, 11 септември 2010 г.

How to install a bin file

Go into a terminal and issue the following command in the directory where the bin file is:

chmod a+x name_of_file.bin

Then run it by writing:

sudo ./name_of_file.bin

вторник, 31 август 2010 г.


Ubuntu Linux: Delete directory command in Terminal


You need to use the rmdir utility / command. The rmdir utility
removes the directory entry specified by each directory argument,
provided it is empty. Arguments are processed in the order given. In
order to remove both a parent directory and a subdirectory of that
parent, the subdirectory must be specified first so the parent
directory is empty when rmdir tries to remove it.
Remove / Delete directory called /tmp/fooOpen the terminal. Type the following command:
$ rmdir /tmp/foo

понеделник, 30 август 2010 г.

 Ubuntu will not start on Thinkpad


Workaround A: Re-enable KMS
For release we made the decision to blacklist KMS for 8xx hardware. If you had found that beta1 and earlier Ubuntu had been working fine, this may be an effective workaround for you.
To turn KMS back on, run this command in a Terminal window and reboot:

echo options i915 modeset=1 | sudo tee /etc/modprobe.d/i915-kms.conf
sudo update-initramfs -u

In some cases, this bug causes i8xx users to boot into a blank screen on both the LiveCD/USB and a clean install or upgrade. To enable the above workaround in these situations, add

i915.modeset=1

to your kernel boot parameters.

From the LiveCD:
1) At the purple screen with a keyboard and stickfigure, press Enter to get to the menu.
2) Hit Enter to select your language, and then press F6 and then Esc.
3) Add "i915.modeset=1" after "quiet splash".
4) Press Enter to boot the LiveCD.

From an installation:
1) Hold down Shift while booting to enter the GRUB menu.
2) Press 'e' to edit.
3) Add "i915.modeset=1" after "quiet splash".
4) Ctrl+x to boot.
If adding "i915.modeset=1" to your boot parameters allows you to boot successfully, you then need to enter the command above into a terminal to make the changes permanent.

Add 7z (7-Zip) File Archive Support to Ubuntu


Install 7z file archive support from the package p7zip (click the link to install), or by running the command below in your terminal:


sudo apt-get install


You can now create 7z archives by right-clicking a file or folder and selecting Create Archive, and selecting the 7z option. Open a 7z archive by double clicking it.

Open RAR Archives in Ubuntu


The package unrar is not open source, but should be able to open any RAR files you can find. This is likely the option you want. You need to have the Ubuntu multiverse repository enabled to install this package. Install unrar from the package unrar (click the link to install), or by running the command below in your terminal:

sudo apt-get install unrar

After either of these package are installed, RAR archives will open seamlessly in Ubuntu’s archive manager.
Change home folders location


Here is how to change the location of any of your home sub-folders(the example deals with the desktop folder)
Open your terminal and go for
~/.config/user-dirs.dirs

In the following line:
Code:XDG_DESKTOP_DIR="$HOME/"

One can change  different values for the corresponding folders, too.


UPDATE:
Much easier method is using Ubuntu tweak software

Thinkpad middle button config

Step 1. Create a new file

sudo nano /usr/lib/X11/xorg.conf.d/20-thinkpad.conf

Step 2. Insert the following


Section "InputClass"
Identifier "Trackpoint Wheel Emulation"
MatchProduct "TPPS/2 IBM TrackPoint|DualPoint Stick|Synaptics Inc. Composite TouchPad / TrackPoint"
MatchDevicePath "/dev/input/event*"
Option "EmulateWheel" "true"
Option "EmulateWheelButton" "2"
Option "Emulate3Buttons" "false"
Option "XAxisMapping" "6 7"
Option "YAxisMapping" "4 5"
EndSection

Step 3. Save file, restart computer, and enjoy!
Thinkpad Volume On Screen Display Ubuntu Fix


 The volume Up, Down, and Mute buttons work, but no volume bar was displayed on the screen. Here are the instructions to get On Screen Display (OSD) working under Ubuntu Linux.

Jaunty 9.04

* sudo -i
* echo enable,0x00ffffff > /proc/acpi/ibm/hotkey
* gedit /etc/rc.local
* Add Line: echo enable,0x00ffffff > /proc/acpi/ibm/hotkey

Karmic 9.10

sudo -i
cp /sys/devices/platform/thinkpad_acpi/hotkey_all_mask /sys/devices/platform/thinkpad_acpi/hotkey_mask
gedit /etc/rc.local
Add Line: 
cp /sys/devices/platform/thinkpad_acpi/hotkey_all_mask /sys/devices/platform/thinkpad_acpi/hotkey_mask

Lucid 10.04

* Same as Karmic 9.10 above!